So I get it...electric fuel pumps may be more reliable. I'm not sure how that can be when you have a chain-driven camshaft mechanically interface with a pivot arm that moves a single diaphragm, but sure. And, if you're running non-stock carbs, you'd probably want better fuel management (higher pressure?) than a little mechanical pump can provide. But, I never understood why someone would purposefully blank off a mechanical fuel pump, install an electrical one somewhere and call it better. Call me old-fashioned.
Since I put my money where my mouth is, though, I decided to rebuild my fuel pump. The car did not come with an original AC fuel pump, but did come with a reputable after-market one. Made in Canada, I find them for sale, new, from The Roadster Factory (TRF), for about $200. That's not cheap, but I wanted an original AC fuel pump, so I was off to my favorite forum, where I was able to quickly secure one, in rebuildable shape, for about $60. I picked up a rebuild kit from TRF for another $60 or so, and I was off to the races.
Here's the video. Keep reading for a bit more detail.
I did the rebuild during the biggest snowstorm we got during the 2021-22 winter season. We had blizzard conditions for a while and I checked on it from time to time. Fortunately, we didn't lose power, so I was able to work uninterrupted. Lots of shoveling was in my future, though.
During the height of the storm. Big drifts, but blowing off the cars.
Top view of the pump as received. Notice the "AC" mark.
Side view. Obviously some old varnish from evaporated fuel in the float bowl.
Engine side...and more varnish.
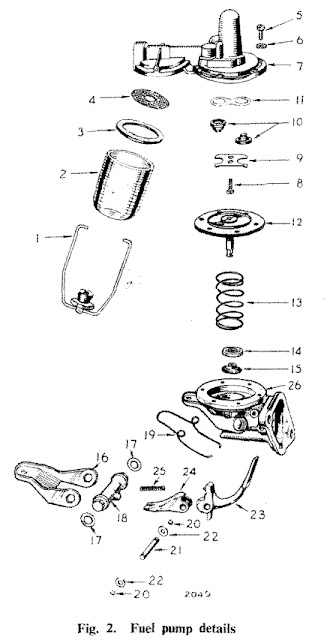
The fuel pump detail above, from the workshop manual, is referred to throughout my discussion. Numbers that I list in parentheses match those in this view and the piece names I use match as well.
The fuel pump disassembles easily, with six screws (5) and lock washers (6) that hold the upper body (7) and lower body (26) together and a stirrup (1) (more than just for horses, I guess) that keeps the glass sediment bowl (2) tight. These are separated and removed, as applicable.
Note that the gauze filter (4) is a tightly woven metal, brass I think. It didn't feel especially fragile, but I suspect it's easy to mess up the weave. They appear to be available new from TRF (part number 500419), but they are on back-order as I write this.
I was able to disassemble everything except for the manual primer level (16), associated hardware (17, 18), and hand primer spring (19). I might have been able to get this assembly off, but it seemed to be pressed or otherwise had some interference fit and I was afraid I wouldn't get it back together securely, so I skipped that.
In the end, I was able to get the manual primer lever (16) and hand primer spring (19) bent back to a working form and it all seemed to work fine on the bench, post-rebuild.
Primer lever and hand primer spring all beat up.
Once I removed the six securing screws (5) and lock washers (6) and removed the upper body (7), I was surprised to find the inlet and outlet valve assemblies (10) held in by a valve retaining plate (9). Of course, if I had reviewed the Workshop Manual beforehand, I would have seen this. My Spitfire has a AC fuel pump, but the valves were pressed and staked into the body, making replacement difficult (I didn't even try).
I removed the screws for the retaining plate (8) and, taking note of the valve orientation, removed the valve assemblies. The small, figure-8 shaped valve gasket (11) under them was also removed.
Close-up of the valve assemblies and retaining plate.
That was about it for the upper body, so on to the lower body. The diaphragm assembly (12) appeared to be original, or at least was an original AC replacement.
Diaphragm assembly. Those white marks are the letters AC, the manufacturer.
The diaphragm assembly is twist-locked into the link lever (24), so a quick 90-degree rotation and it should come out; you might have to mess with it a bit. Underneath is the diaphragm spring (13), oil seal (15) and oil seal retainer (14). The diaphragm spring is not that strong, but know that it's under there so it doesn't get away from you. The oil seal retainer is a light friction fit so it should come out easily, but I did use a small flat-head screwdriver to pry it out.
I then removed one circlip (20) and washer (22) holding in the rocker arm pin (21), and knocked that out carefully. This allowed for removal of the rocker arm (23), link lever, and rocker arm spring (25). <sorry, I didn't take any pictures of that process, but I documented it in the video>
Everything went in to my ultrasonic cleaner in a heated bath of Purple Power for about 20 minutes. That, along with a bit of agitation by a brass and nylon cleaning brush left it nice and clean.
Assembly was the reverse of removal. The rebuild kit contains a new diaphragm, inlet and outlet valve assemblies, valve gasket (11), cork seal (3) (but it's rubber), and pump body to block gasket. The diaphragm has a small tab on it, but it is not important to refitting it and there is no orientation requirement.
Big difference for not a lot of time or money.
Really happy with the float bowl.
Priming arm and spring are functional, if still a bit beat up.
All in all, not a terribly difficult job that took just a couple of hours. I did the same thing on my Spitfire fuel pump (without replacing the valve assemblies). That has been operating well, without leaks, for about 500 miles. I think they both will operate just fine and satisfy all of my fuel delivery needs. Bah humbug to that new-fangled electrical stuff!
If you are interested in getting emails when I put up a new post, please send me an email, including something like "Subscribe" in the subject line, and I'll add you to the mailing list.
I'm doing this manually, hence the un-automatic way to subscribe.
Of course, if you would like to be removed from the mailing list, please respond to one of the post emails and I'll remove you promptly.
Well, after a long hiatus, I've decide to revive the blog a bit. A few reasons for this: First, if you aren't a regular viewer of my YouTube channel, you may not know that I acquired a new project a bit over a year ago, a 1964 Triumph TR4. It's a numbers-matching car that is in better overall shape than my Spitfire was, but still requires extensive work (new floors, sills, engine work, chassis, etc.). I consider the TR4 a "next level" car as compared to the Spitfire, so I'll be taking extra special care to do this one right, along with all of my lessons learned from the Spitfire.
She followed me home!
Second, I have found that this blog keeps me disciplined with being more meticulous about recording what I'm doing in photographs vice just video. I've tried to make an effort with the TR4 to take more pictures, especially during disassembly. While I was better to start, I've been slipping lately so I hope that having to update this blog in my normal way, I'll be more mindful of taking pictures and noting things I do.
Finally, I had the Spitfire to her first car show on June 5th (British by the Sea) and was lucky enough to pick up Best in Class. That was a good shot in the arm and another reason to more closely document the restoration of the TR4.
That's a beer mug trophy in front of the windscreen. Awesome!
For now, I'm going to just provide links to the videos that I've done about the TR4 so far. There have been about 20 of them so you'll find links to them all below. Of course, you can just visit my YouTube channel and find them directly, but for convenience, they are listed below.
Thanks, as always, for everyone's support, readership, and viewership. I'll try to keep up with this and make it worth your time. Feel free to drop me an email or leave a comment. Cheers!

.JPG)
.JPG)
.JPG)
.JPG)
.JPG)
.JPG)


.jpeg)